I love to teach and share what I know. I have been doing a 5 - 10 minute tips and tricks of techniques on Tuesday and Thursday at 2 pm as a Facebook Live. My Business page on Facebook is: https://www.facebook.com/BarbaraPageKellsctmhscrapingfun check out the videos and see what you can pick up to use in your work on cards or scrapbooks. Comment or share your tips. See you there.
Thursday, August 6, 2020

Tuesday, July 14, 2020
A challenge for you
We all like challenges that are fun and help us be creative! Here is the first challenge to start with.
The card stock I use is 5 1/2 x 4 1/4. The 2 cuts are 3/4 x 4 1/4 and 2 1/2 x 4 1/4


The card stock I use is 5 1/2 x 4 1/4. The 2 cuts are 3/4 x 4 1/4 and 2 1/2 x 4 1/4

This is a simple background for a variety of opportunities. To get your creativity juices flowing, I have made some samples to get you going.
You can see that one is landscape and one portrait. I used CTMH shimmer trim and on the left card I added Stickles and the right Shimmer Brush. The Stickles are great but need time to set before you move them.


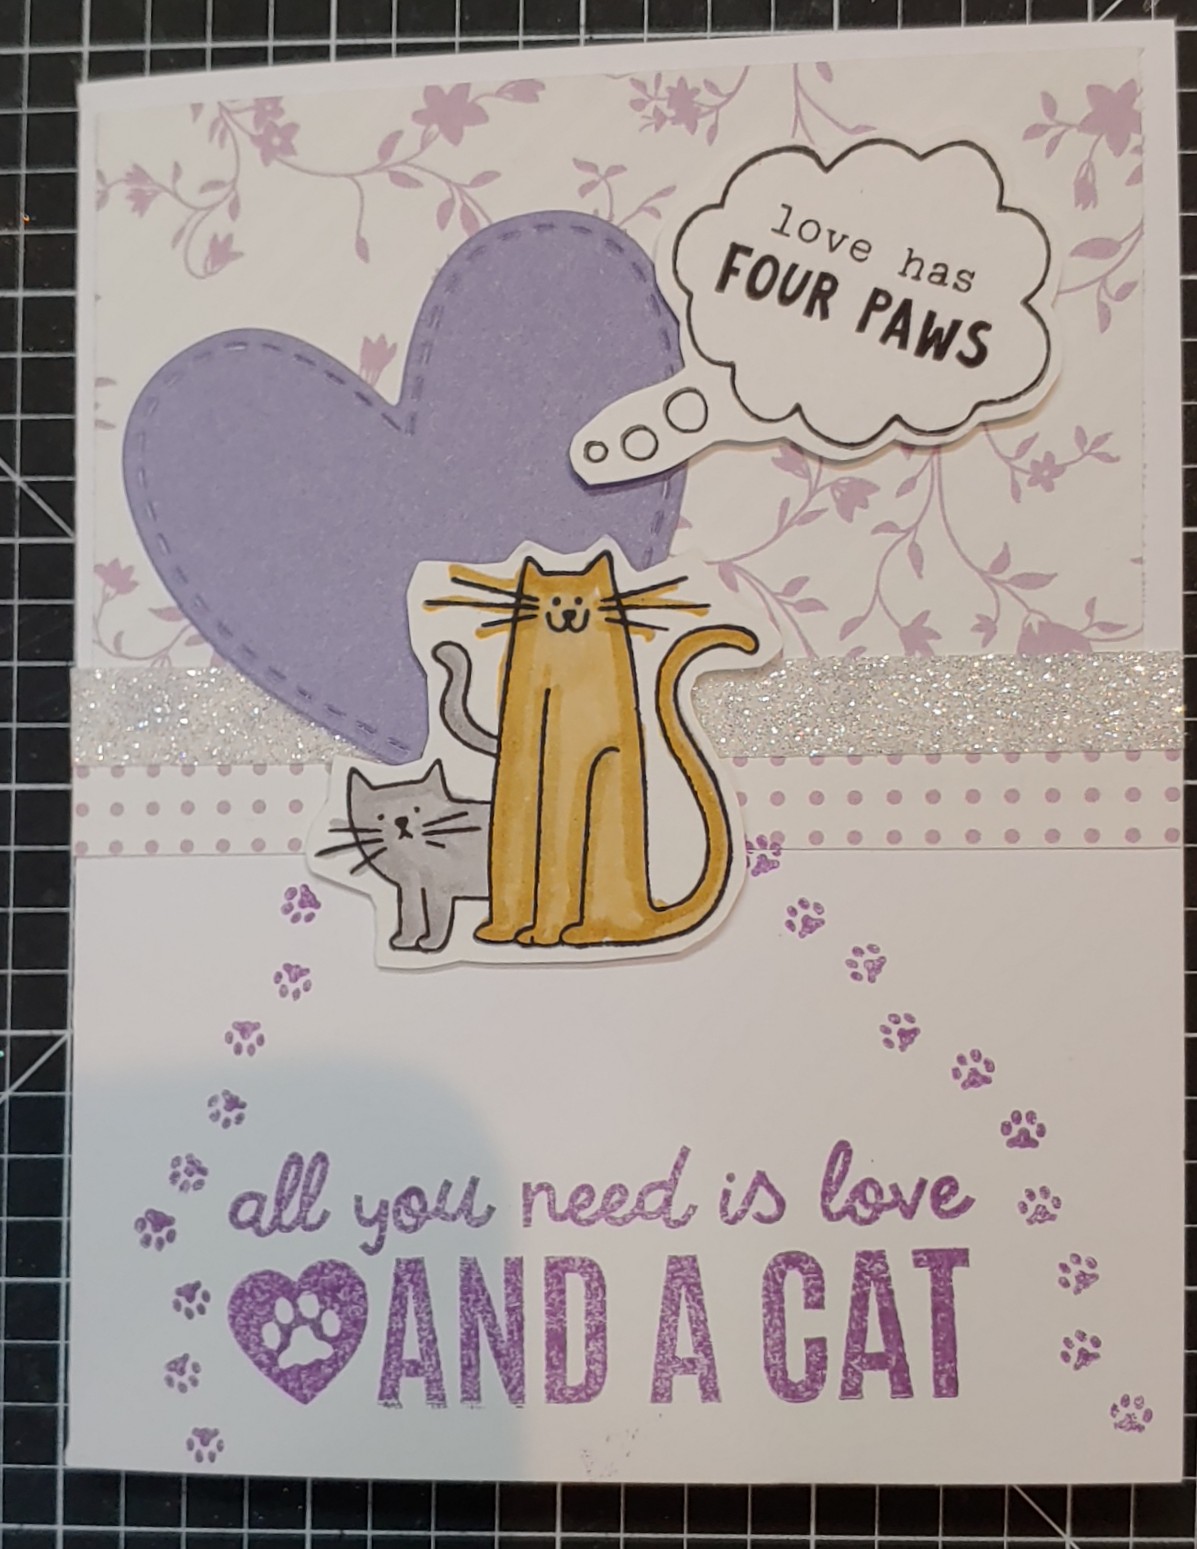
For these 2 cards, I used an older set of cat stamps and again did one landscape and one portrait. I used Shimmer trim on the right card but just the paper piece. You can use the Gold Thread, twine or ribbon as well over the 3/4 x 4 1/4 in the middle or above or on the side.


There was also a dog stamp set awhile a go. On the cats I used the die cut heart and here I used a cute square.

For these I used the tag stamps and thin cuts but if you look close, I used liquid glass over the flower for a catchy look.


I used one stamp set for the tags and used 2 different sentiment stamp sets for the words. It is fun to mix and match different stamps and sayings.
I hope you have a great time trying to see how you can use a basic design challenge and have the cards look so different. Have fun.
Sunday, July 5, 2020
Happiest Place to Be - through August 31
There is a wonderful set of papers, stamps and digital images that you can use for those times at Disneyworld or other vacation spots. To get the digital images, you scroll down to the bottom of my website and click on the Cricut symbol on the bottom of the page.
There is lots to choose from - but only until the end of August.
 I am expecting my paper, stamps and Thin Cuts to come soon. Keep posted to see what great things you can do for 12 x 12 pages, using Story by Stacy ideas of other sizes of page protectors, make a 6x8 album and much more. Think of the cards you can also make!
There is lots to choose from - but only until the end of August.

Combining older Thin Cuts with a new stamp set
I have enjoyed and shared cards made with our windows Thin Cuts. There is one with 12 squares and one with 12 circles.


In the catalog for July and August, there is a new stamp that will work with both of these Thin Cuts.


I always like to try out what might work for cards. I have put the small squares and circles behind the Thin Cuts but this time I just put paper that covered the card and put the Thin Cut on and then stamped and cut out the 12 critters and bumped them up with 3 d foam.


I am going to "play" with this stamp set and these Thin Cuts some more. I do like coloring the animals about their right shades but on one card I just used different colors and I sort of like that card too. If you decide to make some cards, let me know how it goes.


In the catalog for July and August, there is a new stamp that will work with both of these Thin Cuts.

The Stamp set is called Little Buddies.

I always like to try out what might work for cards. I have put the small squares and circles behind the Thin Cuts but this time I just put paper that covered the card and put the Thin Cut on and then stamped and cut out the 12 critters and bumped them up with 3 d foam.


I am going to "play" with this stamp set and these Thin Cuts some more. I do like coloring the animals about their right shades but on one card I just used different colors and I sort of like that card too. If you decide to make some cards, let me know how it goes.
Tuesday, April 14, 2020
Zoom option
I have 2 projects ready for a 30 minute Zoom class.
Project 1 - make 14 different cards. Most of the time I make 10-12 of one design. I am going through my stash and find 1 patterned paper and 1 cardstock and 1 neutral. I have the sketch cuts and would like to show you how you can use old and new stamps and create some great cards.
Project 2 - make 2 - 12x12 page layouts.
12x12 - use 1 pattern paper and 1 cardstock on 2 base pages
12x12 - use 6 4x4 pieces of paper
Both of these are simple layouts but give you lots of room and options for 4x6 and 4x4 pictures. What makes the page will be your embellishments and stamps you use.
If you are interested in one or both of these projects, email me revskell@gmail.com. I am looking forward to getting together. Leave time and dates that are best for you. I will send you the cutting guide and the information of how to join the Zoom meeting.
Project 1 - make 14 different cards. Most of the time I make 10-12 of one design. I am going through my stash and find 1 patterned paper and 1 cardstock and 1 neutral. I have the sketch cuts and would like to show you how you can use old and new stamps and create some great cards.
Project 2 - make 2 - 12x12 page layouts.
12x12 - use 1 pattern paper and 1 cardstock on 2 base pages
12x12 - use 6 4x4 pieces of paper
Both of these are simple layouts but give you lots of room and options for 4x6 and 4x4 pictures. What makes the page will be your embellishments and stamps you use.
If you are interested in one or both of these projects, email me revskell@gmail.com. I am looking forward to getting together. Leave time and dates that are best for you. I will send you the cutting guide and the information of how to join the Zoom meeting.
Wednesday, March 25, 2020
5 things to organize
I love my time to work. I have a 10 foot table that is usually piled high - about 1 foot deep for all 10 feet - and yet I know where everything is until I have to empty the table for family use and then it is chaos to find things again. I am fairly organized on shelves but when I have a lot of projects going at once, I don't always get things back to their home spot. Then when I want them again, I take a while to find them.


As you can see, all the shelves are full. What you can't see is a very large plastic box at the end of the room that needs sorting. So I am taking time to sort.
The 5 things I am taking time to organize before I start up projects again are:
inks
stamps
designs
paper
Bling and Embellishments
Inks:

I have the new ink pads in the ink cases Z6003 and the old inks still in their tower. The even older inks I found a fishing tackle box that was the right size. I keep the re-inkers together in a double box with the new ones on top and the older ones on the bottom. I still have old paper so I keep the old inks and re-inker. Just like they tell you to change your battery with the time change, I check the inks and reink them once or twice a year. They have a place on the shelf when the table needs to be clear but when I am working they are on a small table for easy access.
Stamps:
At one time I scanned all my stamps and put the images in a binder. I gave that up. Close To My Heart has changed their group designations over the years. I have gone to a different method. I put the stamps in an Excel workbook with a sheet titled for each designation of CTMH as well as by the designation that I would look for it. I color code each stamps and box with hole reinforcements and the names on the box of the designation that is in there. When I put the stamps away, I don't put them by number or name, just by color.
I use Avery Hole Reinforcements. I get the white ones in 1,000 a pack and use permanent markers to color them a page at a time. I have found colored ones and used them but there are more desingations than those colors.

Before CTMH came out with My Acrylix organizer Z1038 or the My Acrylix mini organizer Z3106 or the double one that isn't available any more, I used Iris boxes - long and short. I found them at Ace hardware. I just take a stamp with me to see if it fits. Most boxes don't. They need to be about 7 x 14 to get the stamps into the box with a cover and I use a piece of cardboard to divide the box in half. Last winter I took all the plastic snaps off and there was so much more room!
I put the M size stamps in the little boxes that they fit so well in. I have all the stamps with thin cuts in their "season" like Winter, Christmas, Flowers etc but the generic thin cut that are just thin cuts are in the My Acrylix organizer and the generic stamps/thin cuts are in a box.
Designs:
I love all the How - To Books from CTMH . I love that each paper packet project has always come with designs. I have used them over and over with different papers and make slight adjustments for what I am doing. I have put many in 3 ring binders and use the different see through an solid flags from the office store. I prefer the solid as it is easier to read.

This time I have gone through my 3 ring binders and written each name of paper design that is in the book. I have also put into 3 ring binders all the designs I have done over the year. I also ahve put other things that I have found useful to keep. I am doing an Index binder with all the indexes of the books and so far I am up to 25 ring binders. This is my current project. I can look at the index binder and narrow down which books I want to pull out and look for.

Paper:
I am still overwhelmed with this project. I used to keep the cardstock in their old sections :Adventure, Enchantment, Whimsy, Basic etc but now the cardstock just by color. I have tried looking at the color wheel and keeping them in families.
I have at times kept the finished pages and the scraps together in their bag so that I could make more pages if I needed to. I could never find the pages when I needed so I put finished pages in an album and kept the scraps together but it is overwhelming to find them at times.


As you can see, all the shelves are full. What you can't see is a very large plastic box at the end of the room that needs sorting. So I am taking time to sort.
The 5 things I am taking time to organize before I start up projects again are:
inks
stamps
designs
paper
Bling and Embellishments
Inks:

Stamps:
At one time I scanned all my stamps and put the images in a binder. I gave that up. Close To My Heart has changed their group designations over the years. I have gone to a different method. I put the stamps in an Excel workbook with a sheet titled for each designation of CTMH as well as by the designation that I would look for it. I color code each stamps and box with hole reinforcements and the names on the box of the designation that is in there. When I put the stamps away, I don't put them by number or name, just by color.
I use Avery Hole Reinforcements. I get the white ones in 1,000 a pack and use permanent markers to color them a page at a time. I have found colored ones and used them but there are more desingations than those colors.

I put the M size stamps in the little boxes that they fit so well in. I have all the stamps with thin cuts in their "season" like Winter, Christmas, Flowers etc but the generic thin cut that are just thin cuts are in the My Acrylix organizer and the generic stamps/thin cuts are in a box.
Designs:
I love all the How - To Books from CTMH . I love that each paper packet project has always come with designs. I have used them over and over with different papers and make slight adjustments for what I am doing. I have put many in 3 ring binders and use the different see through an solid flags from the office store. I prefer the solid as it is easier to read.

This time I have gone through my 3 ring binders and written each name of paper design that is in the book. I have also put into 3 ring binders all the designs I have done over the year. I also ahve put other things that I have found useful to keep. I am doing an Index binder with all the indexes of the books and so far I am up to 25 ring binders. This is my current project. I can look at the index binder and narrow down which books I want to pull out and look for.

Paper:
I am still overwhelmed with this project. I used to keep the cardstock in their old sections :Adventure, Enchantment, Whimsy, Basic etc but now the cardstock just by color. I have tried looking at the color wheel and keeping them in families.
I have at times kept the finished pages and the scraps together in their bag so that I could make more pages if I needed to. I could never find the pages when I needed so I put finished pages in an album and kept the scraps together but it is overwhelming to find them at times.

My sister gave me these shelving when the store she worked at closed.

I have kept the scraps by color in the boxes on the right and stacked them.

This large tub keeps all the bags of scraps.

I try and put seasonal paper in the plastic boxes as well as paper and other things that are for projects I am doing. I have a T-shirt that says "You can't get to heaven until you finish your scrapbooks". In that case, I will be there for a long time.
Bling and embellishment:
Before CTMH came out with the Small Craft Organizer Z4205, I had some plastic cases that were too small for the stamps that I still use. The M Size stamp box is great for shimmer trim and ribbon. There are still Accessory Rollup Z3121 from the website.
Let me know what you use and if this has been helpful in your search for organizational bliss out of the chaos. Have fun with your projects and take time to organize with free time now or in between projects.
Friday, March 13, 2020
Australian stamp for the fire relief effort
The stamp W1202 will end March 11:59pm So far Close To My Heart has been able to give $43,000 to the relief effort.


If you have this stamp, what do you see for cards or scrapbooks? If you have made things, please post and share you ideas.
Subscribe to:
Posts (Atom)